Step 1: Within the Project Design Environment, Click Equipment on the left Navigation Bar.
Step 2: Select and Load Modules
The Module Options drop down menu allows users to select and load up to 5 module profiles into each optimization run. These module profiles must be created outside of the project environment within Your Account (see Create and Edit Module Profiles). If more that one module is loaded, each will be handled as a separate case in which the entire system is designed around that module.
Note – It is not currently possible to design a site using multiple modules simultaneously within a single design.
Once a module profile is loaded into the project, the technical specifications may be viewed but not edited. However, the cost of the module may be overwritten. This does not overwrite the cost of the module within the module profile, only within the project. This is done since the technical specifications should be static for a given module, but the cost may vary from project to project.
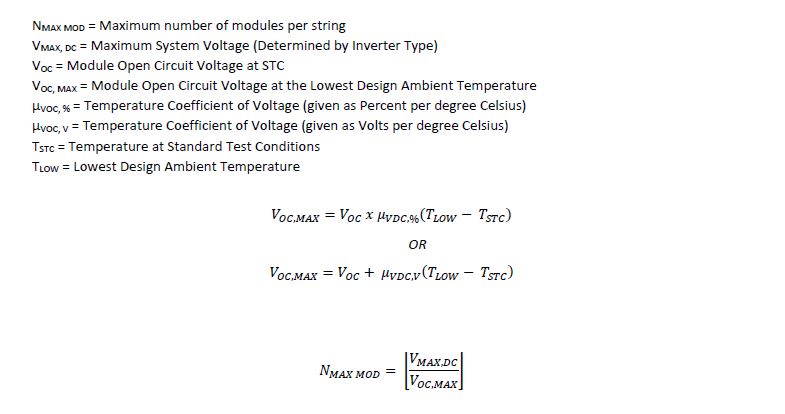
Additionally, once one or more inverters are loaded into the project (see Step 3 below), a String Sizing button will appear. This allows the user to view the maximum string sizing for each module for each inverter selected. Because each inverter selected may have a different Maximum DC Voltage limit, the maximum string size for a given module may vary. The platform uses the module characteristics, inverter maximum DC voltage and the ASHRAE Extreme Annual Mean Minimum Design Dry Bulb for the site (obtained from the nearest ASHRAE weather station). The equation used to compute the maximum string size is as follows:
Note – The maximum string size is a constraint used within the design. The system may choose a smaller string size based on the rack configuration. Also, it is not currently possible to explicitly define the string size. However this feature will be released in the future.
Step 3: Select and Load Inverters
The Inverter Options drop down menu allows users to select and load up to 5 inverter profiles into each optimization run. These inverter profiles must be created outside of the project environment within Your Account (see Create and Edit Inverter Profiles). If more that one inverter is loaded, each will be handled as a separate case in which the entire system is designed around that inverter.
Note – It is not currently possible to design a site using multiple inverters simultaneously within the design.
Once an inverter profile is loaded into the project, the technical specifications may be viewed but not edited. However, the costs associated with the inverter may be overwritten. This does not overwrite the cost of the inverter within the inverter profile, only within the project. This is done since the technical specifications should be static for a given inverter, but the cost may vary from project to project.
Step 4: Review the Minimum Design Temperature versus Maximum String Sizing
Click on the Min Design Temp button next to the module selection drop down menu. The minimum design temperature is used in the string sizing calculations. By default, the Extreme Annual Mean Minimum Design Dry Bulb Temperature from the closest ASHRAE weather station is loaded. However, you may override this temperature here by selecting the User Defined option and entering your preferred minimum design temperature and clicking Update.
Once the Min Design Temp is set, you may review the maximum string size for each module and inverter combination by clicking the String Sizing button next to each module loaded.
Step 5: Select and Load the Rack
The Rack Options drop down menu allows users to select and load a rack profile into each optimization run. The rack profile must be created outside of the project environment within Your Account (see Create and Edit Rack Profiles).
Note – It is not currently possible to design a site using multiple racks simultaneously within the design.
Once a rack profile is loaded into the project, the technical specifications may be viewed but not edited. However, the costs associated with the rack may be overwritten. This does not overwrite the cost of the rack within the rack profile, only within the project. This is done since the technical specifications should be static for a given rack, but the cost may vary from project to project.
Additionally for tracking racks, the Shading Mode button allows the user to choose whether the tracker should be operated in backtracking or self-shading mode.
Step 5: Click Save